Homemade Cream Cheese: Smooth and Tangy
- Time:5 minutes prep + 10 minutes cook + 15 minutes straining = 30 minutes total
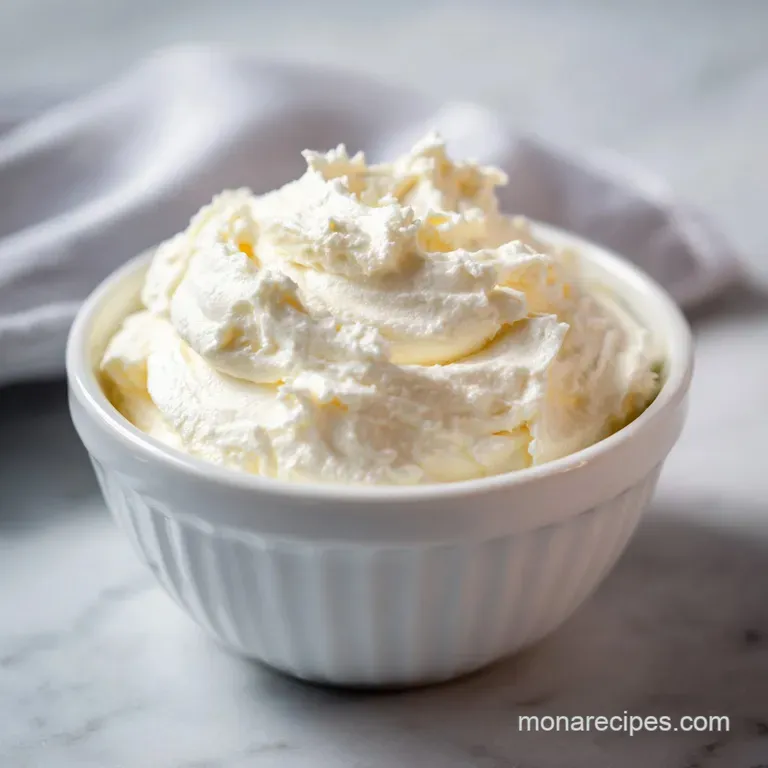
- Flavor/Texture Hook: Tangy, velvety, and incredibly smooth
- Perfect for: Weekend brunches, homemade bagels, or a rich frosting base
- The Science Behind This Simple Success
- Component Analysis and Pro Secrets
- Selecting Your Base Elements
- Precision Tools for a Flawless Finish
- Mastering the Three Critical Technique Windows
- Resolving Texture Issues for a Spread
- Adjusting Your Batch Size Safely
- Debunking Common Dairy Myths
- Keeping Your Homemade Spread Fresh
- Creating the Perfect Breakfast Board Pairing
- Recipe FAQs
- 📝 Recipe Card
The Science Behind This Simple Success
Making cheese is a controlled "spoiling" process where we encourage the proteins in the milk to clump together. When we heat the milk, we are preparing the whey proteins to bond with the casein.
Adding the lemon juice drops the pH of the milk, which causes the casein proteins to hit their isoelectric point the specific acidity level where they can no longer stay dissolved in the liquid and must bond together to form curds.
- Thermal Denaturation: Heating the milk to a rolling simmer unfolds the proteins, making them ready to bind.
- Acidic Coagulation: Lemon juice provides the protons needed to neutralize the negative charge on protein molecules, allowing them to aggregate into curds.
- Emulsification: The final blending step mechanically breaks down the curd structure while the remaining fat is evenly distributed for a silky mouthfeel.
| Method | Total Time | Texture Outcome | Shelf Life |
|---|---|---|---|
| Fast (Acid Set) | 30 minutes | Velvety and light | 5-7 days |
| Classic (Culture Set) | 12-24 hours | Denser and sharper | 10-14 days |
This comparison highlights that while the classic method offers a longer shelf life and a deeper tang due to bacterial fermentation, the acid set method we are using today provides an immediate reward with a much fresher, cleaner dairy profile that is perfect for immediate consumption.
Component Analysis and Pro Secrets
To get the best results, every ingredient must serve its specific scientific purpose. We aren't just adding things for flavor; we are building a structure.
| Ingredient | Science Role | Pro Secret |
|---|---|---|
| Whole Milk | Protein & Fat Base | Use the freshest "Standard" pasteurized milk, not Ultra Pasteurized (UHT), as UHT proteins won't bond well. |
| Lemon Juice | Coagulant | Freshly squeezed juice provides a cleaner tang than bottled versions which can have a metallic aftertaste. |
| Sea Salt | Flavor & Texture | Salt doesn't just season; it helps tighten the protein bonds slightly for a better set. |
Selecting Your Base Elements
You don't need a long shopping list to make this happen, but the quality of your dairy will dictate the final richness of your cheese. Don't even bother with low-fat or skim milk here; the fat is what gives the cheese its luxurious, shatter proof spreadability.
- 2 Liters whole milk: Why this? Provides the essential fat and protein ratio for a creamy, non rubbery result.
- 4 Tablespoons lemon juice: Why this? The catalyst that triggers the separation of curds from the whey liquid.
- 0.5 teaspoon sea salt: Why this? Enhances the natural sweetness of the milk and acts as a mild preservative.
| Original Ingredient | Substitute | Why It Works |
|---|---|---|
| Whole Milk | Heavy Cream (Partial) | Replacing 10% of milk with cream makes it even richer. Note: Increases fat content significantly. |
| Lemon Juice | White Vinegar | Similar acidity levels (around 5%). Note: Provides a more neutral, less fruity tang. |
| Sea Salt | Himalayan Pink Salt | Contains trace minerals. Note: Adds a subtle earthy note but functions identically. |
I've tried using lime juice in a pinch, but it adds a very distinct tropical note that doesn't always play well with a morning bagel. Stick to lemon or vinegar for that classic flavor profile. If you happen to be baking chewy chocolate chip cookies while making this, you'll find that the leftover whey is actually a fantastic substitute for water in the dough!
Precision Tools for a Flawless Finish
Having the right gear makes the difference between a grainy mess and a velvety spread. You want to avoid reactive metals like aluminum, which can leach a metallic taste into the cheese when the acid is added.
- Heavy Bottomed Pot: Essential for even heat distribution. A stainless steel or enameled cast iron pot prevents the milk from scorching at the bottom.
- Fine Mesh Strainer: This supports the cheesecloth and ensures you don't lose any small curds down the drain.
- Cheesecloth: You'll want a high-quality, fine weave cloth. If yours is very thin, double it up to catch every bit of dairy gold.
- High Speed Blender: This is the "secret" step. Hand whisking won't give you that commercial grade smoothness; you need the mechanical power of a blender to emulsify the fats and proteins.
Mastering the Three Critical Technique Windows

Follow these steps exactly to ensure your proteins behave. Timing is everything when dealing with heat and acidity.
- The Gentle Scald: Pour the 2 liters of whole milk into your heavy bottomed pot. Heat over medium high, stirring frequently with a silicone spatula to prevent scorching. Brings to a rolling simmer until large bubbles break the surface. Note: Stirring prevents a "skin" from forming on top which can create lumps.
- The Separation Science: Remove the pot from heat immediately once it simmers. Stir in the 4 tablespoons of lemon juice one tablespoon at a time. Watch for the milk to break into white curds and yellowish whey. Let it sit undisturbed for 10 minutes. Note: This resting period allows the curds to fully develop and toughen slightly for easier straining.
- The Strain and Purée: Line your fine mesh strainer with cheesecloth over a bowl. Pour the mixture through and drain for 15 minutes. Transfer the warm curds to a high speed blender, add the 0.5 teaspoon of sea salt, and process for 2 minutes until smooth. Note: Do not over drain, or the cheese will be too dry to blend into a spread.
Chef's Tip: If your cheese looks too thick in the blender, add back one tablespoon of the reserved liquid whey at a time. This keeps the texture velvety without diluting the flavor.
Resolving Texture Issues for a Spread
Even with the best intentions, dairy can be finicky. If your result isn't looking like the pictures, it's usually a temperature or acidity issue.
Why Your Cheese Is Grainy
If the mixture looks more like cottage cheese than a smooth spread, you likely overheated the milk or blended it while it was too cold. High heat can cause proteins to tighten into hard little knots.
Why It Didn't Curdle
If your milk just looks cloudy after adding the lemon, the pH hasn't dropped enough. This happens if your lemons aren't very acidic or if the milk was too cold when you added the juice.
| Problem | Root Cause | Solution |
|---|---|---|
| Too Dry/Crumbly | Drained for too long | Blend in 1-2 tbsp of reserved whey or heavy cream. |
| Won't Set | Insufficient acidity | Add 1 more tbsp of lemon juice and heat gently. |
| Bitter Aftertaste | Scorched milk | Keep temperature lower and stir constantly next time. |
Common Mistakes Checklist
- ✓ Never use Ultra Pasteurized (UHT) milk; it won't form solid curds.
- ✓ Always remove the pot from the heat before adding the acid to prevent rubbery curds.
- ✓ Ensure your blender is completely dry before adding the curds to avoid a watery finish.
- ✓ Let the curds rest the full 10 minutes; rushing this leads to lower yields.
- ✓ Don't squeeze the cheesecloth too hard; let gravity do the work to keep the texture light.
Adjusting Your Batch Size Safely
Scaling cheese making is generally straightforward, but you have to watch your ratios.
- To Scale Down (1 Liter): Use half the milk and lemon juice. The cooking time will be reduced by about 30%, so watch the pot closely for that rolling simmer.
- To Scale Up (4 Liters): Double the ingredients but only increase the salt by 1.5x (about 0.75 tsp) to start. You can always add more salt later. Use a larger pot to ensure even heating and prevent boiling over.
- Baking Application: If you are using this as a base for a cheesecake, ensure you drain it for an extra 5 minutes to remove more moisture, which prevents the cake from being too soft.
| Servings | Milk Amount | Lemon Juice | Pot Size |
|---|---|---|---|
| 4 People | 1 Liter | 2 Tablespoons | 2 Quart |
| 8 People | 2 Liters | 4 Tablespoons | 4 Quart |
| 16 People | 4 Liters | 8 Tablespoons | 8 Quart |
Debunking Common Dairy Myths
Myth: You must use heavy cream to make it "cream" cheese. Truth: While "cream" is in the name, whole milk has more than enough fat to create a luscious spread. The "cream" in the name actually refers to the texture, not necessarily the primary ingredient, though commercial versions often add cream for a higher fat percentage.
Myth: Vinegar makes the cheese taste like salad dressing. Truth: Once the curds are strained and blended with salt, the sharp vinegar smell dissipates. White vinegar is actually the most neutral choice if you don't want any fruitiness from lemons.
Keeping Your Homemade Spread Fresh
Since this version lacks preservatives, you need to be diligent about storage.
Storage: Store your finished cheese in an airtight glass container in the fridge. It will stay fresh for up to 7 days. Note that the cheese will firm up significantly as it chills, so take it out 10 minutes before serving for better spreadability.
Freezing: I do not recommend freezing homemade cream cheese. The freezing process breaks the emulsion, resulting in a grainy, watery texture once thawed. It's much better to make small batches fresh.
Zero Waste Tip: Do not throw away that yellowish liquid (the whey)! It is packed with protein and probiotics. Use it as a base for smoothies, use it to soak grains, or even use it as a nutrient rich "water" for your garden plants. If you're a fan of chewy chocolate chip cookies, try using two tablespoons of whey in your next cookie batch to help activate the leavening agents for a better lift!
Creating the Perfect Breakfast Board Pairing
This cheese is a blank canvas. While it's great on its own, it shines when paired with high contrast flavors.
- Savory: Top with "everything bagel" seasoning, fresh chives, and a drizzle of extra virgin olive oil.
- Sweet: Mix in a teaspoon of honey and some crushed freeze dried raspberries for a vibrant pink breakfast spread.
- The Classic: Spread thick on a toasted sourdough slice, top with smoked salmon, capers, and very thinly sliced red onions.
- Decision Shortcut
- If you want X, do Y
- If you want Whipped Texture
- Use a stand mixer with a whisk attachment for 3 minutes after blending.
- If you want Extra Tang
- Add 1/2 teaspoon of citric acid powder along with the salt.
- If you want Bakery Style Density
- Drain the curds for 30 minutes instead of 15 before blending.

Recipe FAQs
How to make homemade cream cheese?
Heat 2 liters of whole milk in a heavy bottomed pot over medium high heat until it reaches a rolling simmer. Remove from heat, stir in 4 tablespoons of lemon juice until curds separate from the whey, and let rest for 10 minutes before straining through cheesecloth and blending the curds with 0.5
teaspoon of sea salt until smooth.
How is cream cheese actually made?
It is made through the process of acid induced protein coagulation. Adding lemon juice to heated whole milk lowers the pH, forcing the milk proteins to clump into curds, which are then strained and processed to achieve a creamy, spreadable consistency.
What are the 5 ingredients in Philadelphia Cream Cheese?
This homemade recipe relies on only 3 core ingredients: whole milk, lemon juice, and sea salt. It does not contain the stabilizers or thickeners found in commercial brands.
Is homemade cream cheese worth it?
Yes, it is highly rewarding for the superior, fresh flavor profile. Homemade versions provide a cleaner taste and allow you to control the salt content, though they have a shorter shelf life than store-bought varieties.
Is it true I can use ultra pasteurized milk to make cream cheese?
No, this is a common misconception. Ultra pasteurized (UHT) milk has been heated to temperatures that alter the protein structure, which prevents it from forming the solid curds necessary for this recipe.
How to troubleshoot watery homemade cream cheese?
Ensure your blender is completely dry before adding the curds. Additionally, avoid squeezing the cheesecloth too hard during the 15-minute draining process; letting gravity drain the whey naturally ensures a better final texture.
Why did my milk fail to form curds?
Check your milk type and temperature. If you used ultra pasteurized milk, it will not coagulate, and if you didn't bring the milk to a proper rolling simmer, the chemical reaction with the lemon juice may be incomplete.
Homemade Cream Cheese

Ingredients:
Instructions:
Nutrition Facts:
| Calories | 84 kcal |
|---|---|
| Protein | 3.9 g |
| Fat | 6.8 g |
| Carbs | 2.1 g |
| Fiber | 0 g |
| Sugar | 1.8 g |
| Sodium | 148 mg |
